Oct 23, 2012

clean and classy white

I'm taking you back to those hot days of summer 
(ohh to be summer again- but that is besides the point)
I love love LOVE garage sales! Swiftly going from one house to the next trying to find the deal of all deals. This was a summer for some great finds! Unfortunately I can't take all the credit for this "beautiful" piece of furniture...


OH.. and thats my FAB cousin "H" in the picture -- she is the finder or maybe (co-finder) of this piece along with her ADORABLE sister "C" and their CUTE momma/my aunt "C" too! 

Yes, it's ok to judge a book by its cover.. OR in this case.. a cabinet by its cover because YES, its pretty ugly here- 

{{let's be real people!}}

BUT this girl (along with some faith from family members) saw the good in this ugly piece and had BIG PLANS FOR HER! 

So here goes:

Started by moving this heavy lug three times until she found a home in my garage where I could strip her, paint her, strip her more until she was ready!

I started by sanding down the thick coat of brown paint and removing the original hardware..


EWW.

Then I started painting her white. I used a Paint and Primer all in one made by Valspar [Signature Series]
The first coat I brushed on and the second I rolled with a 4 inch roller. 


Along with my wonderful hubby (and the help of my mom)we lugged her inside so I could finish. 
Once inside, I sanded away some of the white from the edges of each door, side and front 

Next, was the tricky part. I REALLY wanted a chalkboard top for this baby. Unfortunately, the formica top didn't like the chalkboard paint at all and it peeled off! 

{BACK TO THE DRAWING BOARD!}

TRIP TO LOWES LATER and.. Valspar multi purpose primer became my friend to get the job done! 


 I coated the top with the nastiest smelling primer you have EVER smelled


THEN... CHALKBOARD PAINT! 
[I used Valspar chalkboard paint]

 and bought new hardware for her and...

TA-DA! [[Drumroll PLEASE..]]


BEFORE AND AFTER:


Feel free to comment if you have ANY questions. I would be more than happy to answer! 

She looks good in my living room. 
Thanks again to my wonderful family for finding this piece! 
I'm so excited for next summers garage sale finds!

love, 
L


Sep 16, 2012

Spice it up

want to know a cute, fun and easy... wait.. {fun} project to spice up your kitchen?? 
TRY ROMAN SHADES! 

here is the steps you need to know:
1) First find a FABULOUS person who can sew! (If you have a WONDERFUL mother in law like me then you don't have to worry about that )
2) Pick out some fabric. You will need a thicker fabric (upholstery fabric works great) and also some lining fabric to keep the sun from fading it.
 (side note: Hobby Lobby 40% off & Fields Fabric side-walk sales are the way to go!) 
3) Find a website that will help you with the details, measurement, layout, etc.  (We used Terrell Designs)
4) Start cutting- MEASURE TWICE, CUT ONCE! 
5) Sew material, string it, mount and wa-la!


 Here are my windows BEFORE:  (sorry for the dark photos) 


DURING AND AFTER: 


So there ya' have it! Spice n' up the kitchen!

Aug 7, 2012

year at a glance

1 year ago I married my best friend and love of my life. God has truly blessed us beyond anything that I could have ever imagined this past year. {WHAT. A JOURNEY!!} I love love love being married to such a creative, handy, smart, technical, and Godly man. Here are some snap shots from our life in our first year of marriage. {WHAT. A. BLESSING!} 


I BECAME A MRS!!


 WE TOTALLY ENJOYED EVERY MOMENT AT OUR WEDDING! 
(August)


I got a new job!! (September)
Nick got a new job!! (May)


 One of my best friends had a baby!!- First baby born out of all our friends (March)


WE BOUGHT A HOUSE IN MAY!! 


(Started re-doing it in May)


I gained a sister in law in June!!


We already love our first member of our family- Bryn! (July)


We also got to enjoy the celebration of marriage for a lot of our friends this year!! WHAT A YEAR IT HAS BEEN!! A huge thanks for our family and friends for all your love, help,  support and prayers over the past year!
Now I'm off to celebrate with the love of my life! Cheers to 100 more years together!! :)

Jul 17, 2012

announcing...

Meet to the newest member of our family......
                      {BRYN}


The most cutest.
The most adorable. 

The most loving. 
The most precious
puppy you will ever meet. 

   ok and..
..  some naughty days
.. and maybe a few accidents in the house 
.. and the occasional waking us up in the middle of the night.

but hey.. 
           she is still a puppy! 


She is a German Shorthair Pointer. She was only 3 weeks old when we got to pick her out from the breeder. Here is what she looked like that young:


After many weeks of waiting, we finally got to go and get her on July 4th!(she was about 6 weeks old) Almost two weeks here at the house and she already knows "sit" and which door to use to go outside (to go to the bathroom)! (lots of credit to my hubby for many training hours with her) 
Welcome to our family, Bryn! 


Jul 1, 2012

From drab to fab!!!

WHOOO! SOME BIG WEEKS here at the 'tree house' (thats what our neighbors are calling it) -- we knocked out ALL the appliances and donated them to the local thrift store and said adios to the golden rod yellow and avocado green in our kitchen!

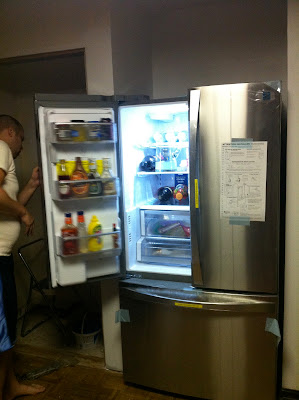
The hubs and I had loads of fun picking out appliances from Sears. I truly wish I had photos of my face from that day at Sears as I sat there and listened to him ask literally 1000 questions to that sales clerk about each one. Guess thats why I love him so much-he is so great about the technical things and especially because he knows the right questions to ask with big purchases. We decided to go with Kenmore Elite series appliances for the kitchen.  The first one we bought was the fridge. This was a tough choice because how in the world to you choose one?? Right away we were overwhelmed with the choices: side by side, freezer in the bottom, ice and water in the door, secret hidden shelves, etc, etc-- how do you pick?? 
In the end, we got this gorgeous gal:


So far so good! I love love love my refrigerator-- and OH MY OH MY how I LOVE THE SPACE it provides on the inside.


About three weeks later we picked out the stove and microwave. And again after many long hours in Sears (shout out to our wonderful salesman- if you ever need anyone in their appliance department, let me know!) we ended up with these beauties:


For the stove, we went with Kenmore's Elite induction range / convection oven. I can't stop ranting about it to everyone that comes over to our house- I love it! For those who don't know a lot about induction, feel free to read all about it here. (trust me- I didn't know a lot about them either until we got one. If you are looking into them, I highly recommend Kenmore!) 
For the microwave we also went with the Kenmore Elite series. We picked between two that they had in the store at the time. Ended up choosing one that had an oven feature as well so we can cook things right in there if we want too -- whooo for a double oven! (well, in a way at least!) 

Here is a peak into the last few weeks in the kitchen:


 The cupboard above the range was removed and my DIY hubby made a new cupboard to fit the hole above the microwave (the pictures don't really show that but he is so talented! He just needs to make me some new doors to match so I can hide away things up there. 

I hope to add more posts this week because I have lots to share!
and.. some big news to spill! {not pregnant, sorry :)} 

peace, love and Happy 4th of July week to you all! 

-L


Jun 5, 2012

Master Bathroom Re-do

My absolute favorite project thus far was the dramatic difference with how our master bathroom turned out. First off, we started with TWO different "fruit" wall paper patterns. That's not all though-- to top it off there was a pink heart border over the top of the wall paper. With a good soaking of water/white vinegar and a WHOLE LOT of scraping with our sore arms- that was  all removed in a flash. 


             paper 1:     paper 2:


Following the paper removal we did a WHOLE LOT OF NASTY WALLPAPER GLUE REMOVAL!  ugh-- that's the worst part in my opinion. It seems like the more you wash the walls, the more it smears the glue around. 

A few days later it was time for the gold shower tear out! (BEST PART!) This was a project that the hubs and I attacked together. He did the tear out and removal of the shower frame and I was his handy helper "side-kick" that helped with tools and holding the shower doors when needed. 


Next, we added a curved shower rod to add a little more space to the shower. Then we hooked up the lovely shower head that will allow my 6ft tall husband to finally fit under the water (he was most excited for this part)!

   BEFORE:            AFTER: 

TA-DA!  Welcome to our new master bathroom! Stop back by tomorrow for another re-do! 

Jun 4, 2012

home SWEET home

WE HAVE MOVED! The hubs and I OFFICIALLY own our FIRST HOME! :) 


The moving process was "quick and easy"...or at least it seemed like it. Moving from a two bedroom apartment to a large house seems so simple yet oh so hard to gather and pack everything up that we had stored in the extra closet spaces of our tiny place.  What made it easier is that we were only moving a mile from the apartment to the house. I seriously couldn't have done it without the help of my wonderful family members from both sides! Lots of moving boxes and hundreds of trips up three flights of stairs, the apartment was empty finally. Memorial day was officially the first time we spent overnight in the house. It felt peaceful to finally fall asleep in our very own home :)


Here is where the day began: boxes, boxes and more boxes.. 


And this is where it ended:
HOMEOWNERS! 


More to come... 


May 6, 2012

next step

Why why why has it been so long since I have updated or posted anything?! I would love to blame it on fun vacations and lots of down time spent with hubby and friends. 
Truth is --- {{drum roll please}}---  WE BOUGHT A HOUSE! So all that "down time" lately has been spent packing, picking out paint colors, and preparing our "plan of attack" for the house :D It truly is very exciting (or at least I am telling myself that as it's very overwhelming too). This is a totally new step for my hubby and I to take. 
Closing on the house and moving will be this week (crossing our fingers)!!! It really has been one roller coaster of a ride during the last three months - picking a house, working with the realtors, many hours spent dealing with the bank and SIGNING OUR NAMES 100,000 times- {ok.. exaggeration a tiny bit, but still felt like it}.
The best part about this house is that almost every room needs a facelift. Which means lots of neat ideas floating around in this little head of mine. Thank goodness for the internet, including pinterest.com (if you haven't seen this site yet check it out------> here!
My goal (cough cough.."goal") is to have this blog devoted to "BEFORE & AFTERS"of the house so that I can keep track for myself (memories to look back on later) and to share with you! :) 
Stay tuned for lots of posts about our long haul of house projects :)


catch up with you later - (sooner than last time, I promise)


L

Jan 30, 2012

letters.

For the baby shower I hosted a few weeks ago (see it here), one of the things I made for the cute momma-to-be were yarn covered cardboard initials for baby Theo. 

I got the idea from this source: way to go pinterest idea!

I started with purchasing the letters and yarn from a local craft store. Then found an "investment tool" at my in-laws house (WHOOO for my "new" used glue gun of my VERY OWN!!-- LOVE IT!!) 


I started by hot glueing the end of the string to the base of the shortest side of each letter. Then by wrapping (in smooth lines) I continued to wrap all the way around each side evenly. It takes time... lots and lots of time to get each one to line up properly. 


*********

Best piece of advice is to hot glue tiny dots (on the back of the letter only) every so often, this way you are securing the smooth lines you just created.  For the round 'B' letter, you have to cut the string off the yarn ball (I cut about 5 feet at a time) and weave it in and out of the inner circle of the letter. 

Here is the next trick.... LAYER! .. layer.. and then layer again!  I'm pretty sure my final outcome has four layers on it. The layering really helps hide spots that may be hard to cover- like corners!  Sometimes, no matter how hard you try or how much glue you use, it still shows... so last and finally just paint those spots that you just can not cover.


TA-DA:


So there ya' have it folks! 
Gotta love craft days- no matter how long they take :)


again.. forgive me and the cell phone pictures
(I MUST GET BETTER ABOUT USING A REAL CAMERA FOR MY PHOTOS)